Guide
Plantar Fasciitis Taping Guide: Step-by-Step Instructions for Relief (2026)
By Dr. Lisa P., Podiatrist · Updated 2026-03-29
This post contains affiliate links. As an Amazon Associate I earn from qualifying purchases at no extra cost to you.
Plantar Fasciitis Taping Guide: Step-by-Step Instructions for Relief (2026)
By Dr. Lisa P., Podiatrist | Last updated March 2026
Taping is one of the fastest ways to reduce plantar fasciitis pain — clinical evidence shows it can cut arch strain by up to 34% in a single application. This guide covers the two most effective taping techniques (low-Dye and kinesiology), five top-rated tape products, and a complete step-by-step method you can apply yourself at home.
Shop Top Taping Products on Amazon →
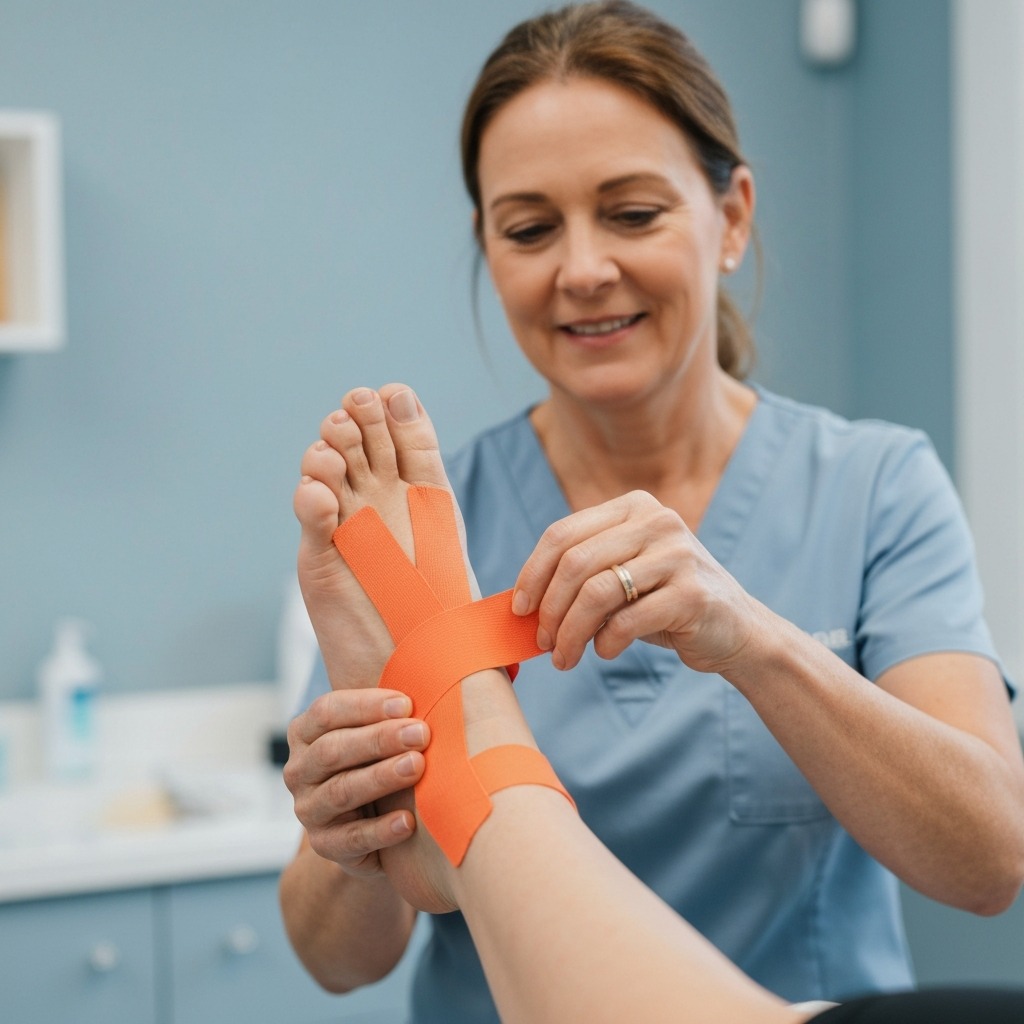
Table of Contents
- Why Taping Works for Plantar Fasciitis
- Taping vs. Orthotics: What the Research Says
- Method 1: Low-Dye Taping (Step-by-Step)
- Method 2: Kinesiology Tape (KT Tape) Technique
- Method 3: Heel Lock Taping for Athletic Events
- Top 5 Taping Products for Plantar Fasciitis
- How to Prepare Your Skin Before Taping
- Common Taping Mistakes to Avoid
- When to Use Taping vs. Other Treatments
- Frequently Asked Questions
- Sources & References
Why Taping Works for Plantar Fasciitis
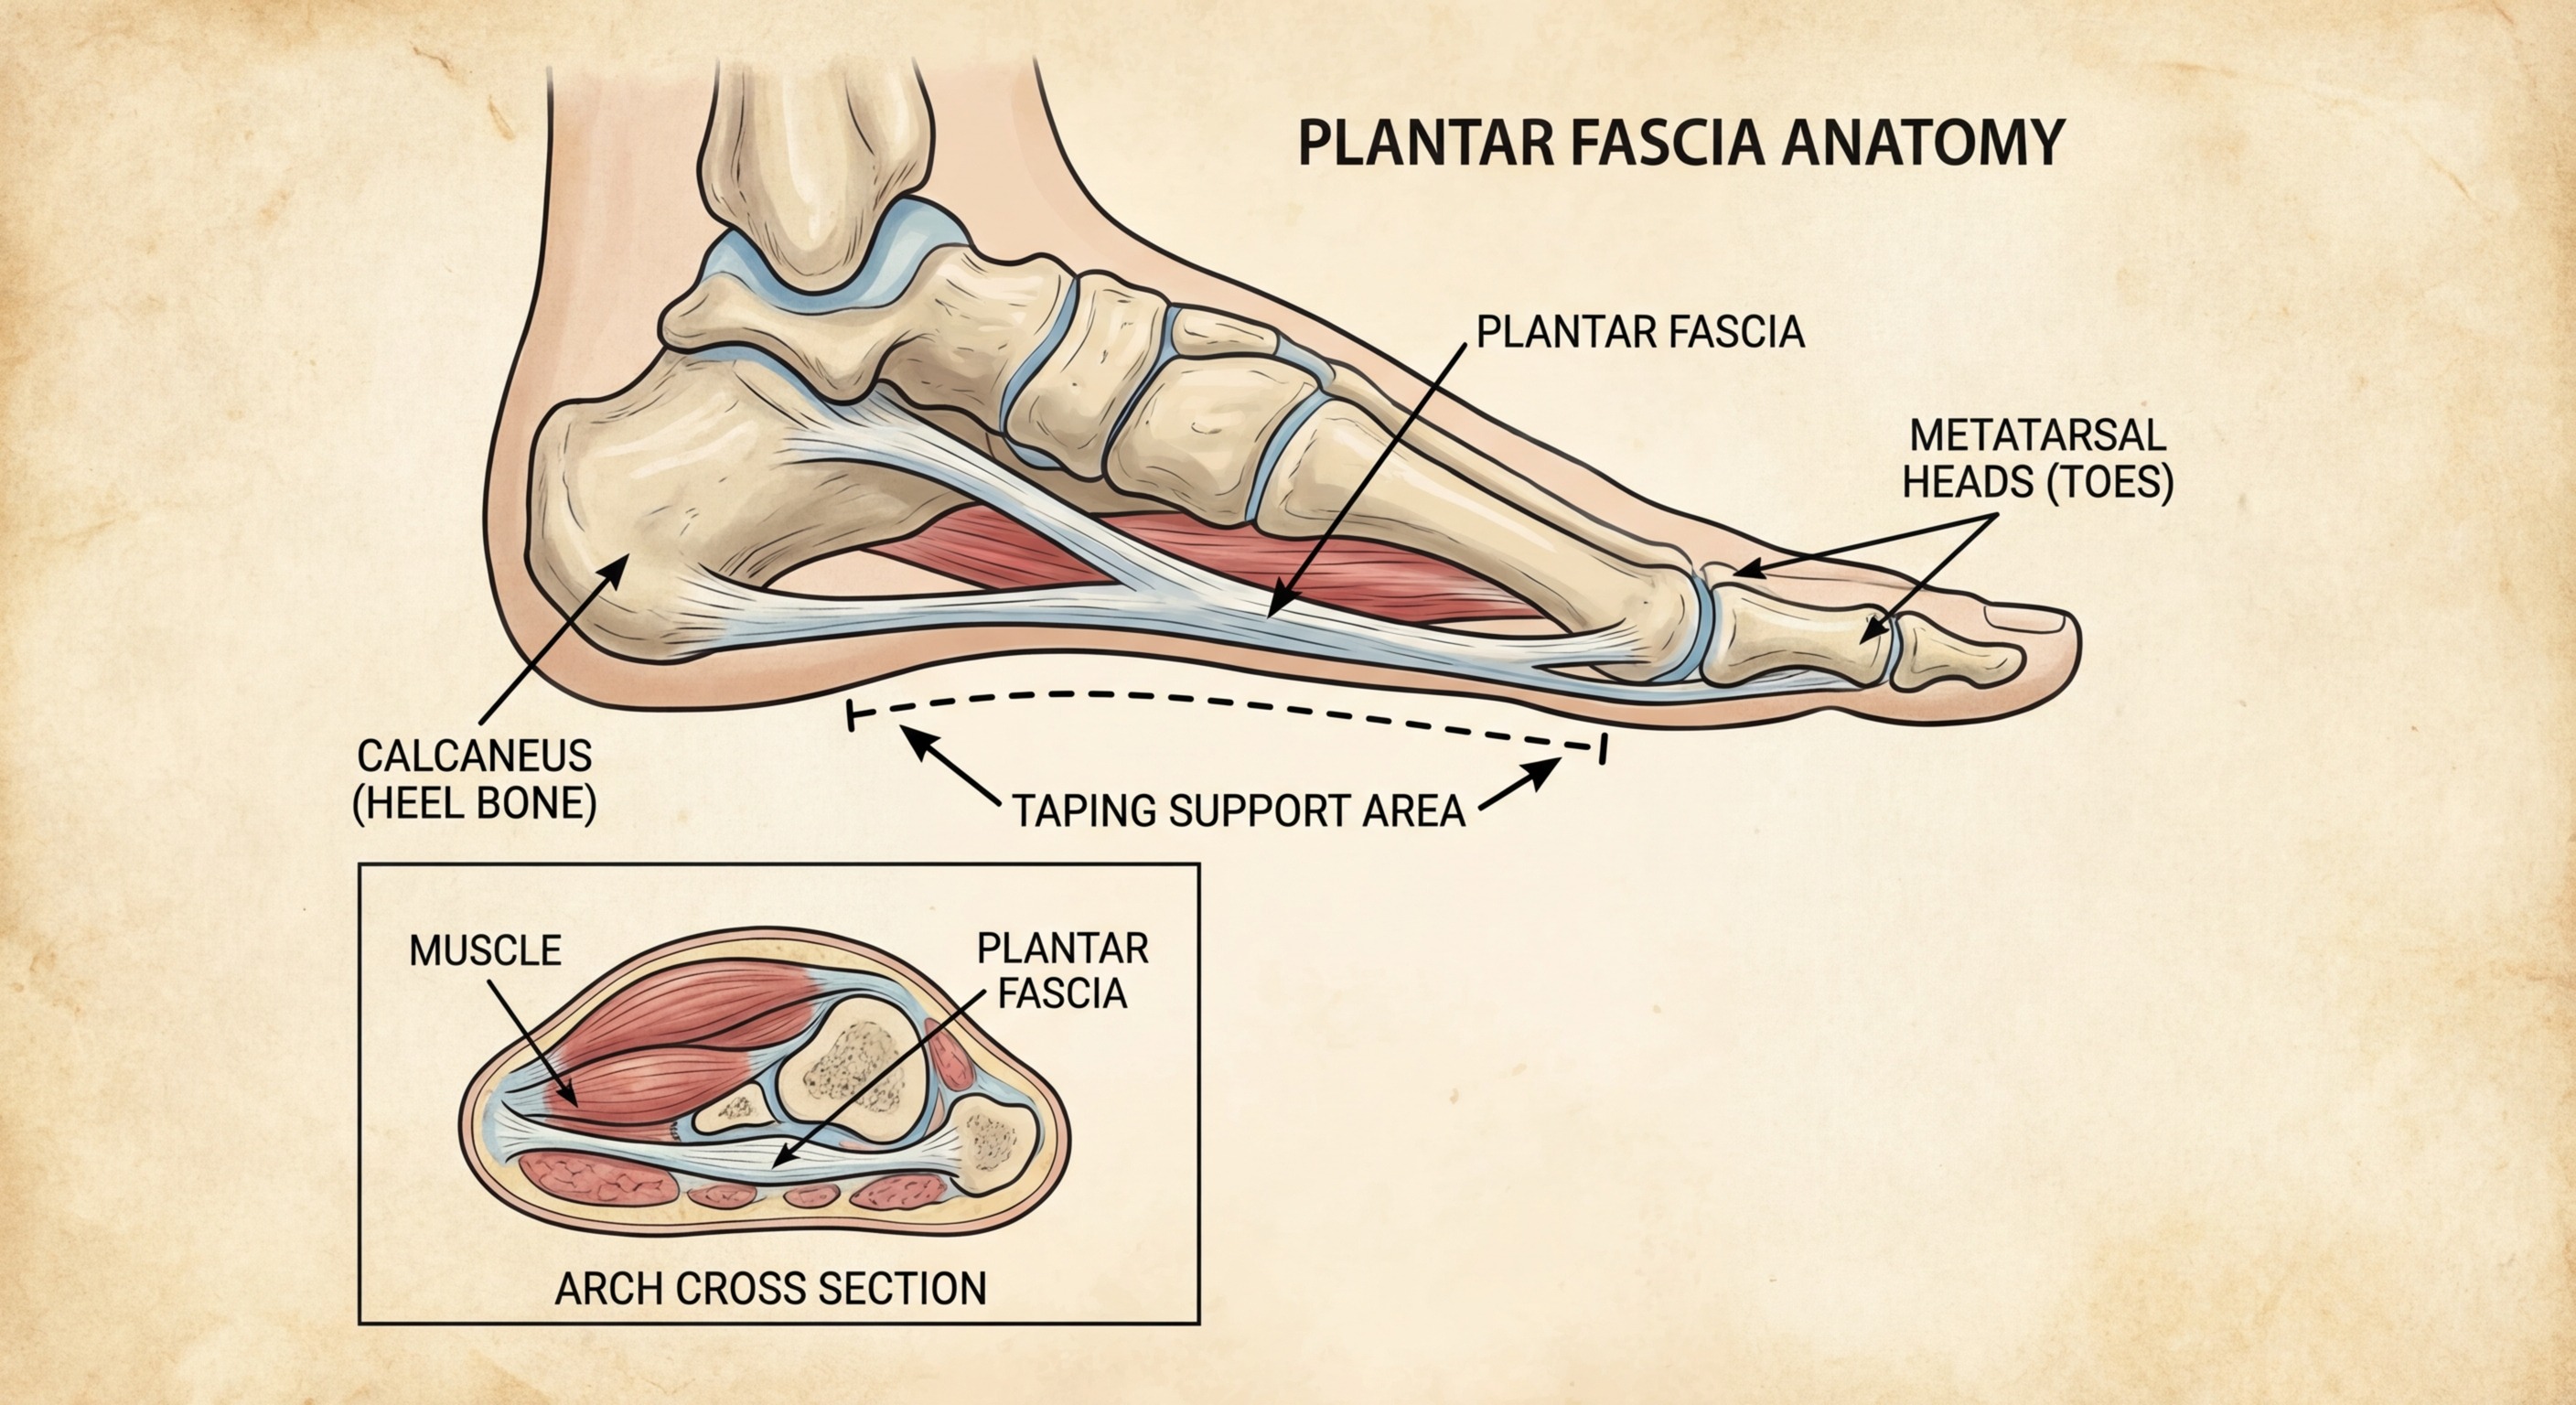
The plantar fascia is a thick band of connective tissue running from the heel bone (calcaneus) to the base of your toes. When it becomes inflamed — a condition called plantar fasciitis — every step you take stretches and re-injures this already irritated tissue. Taping addresses this problem mechanically: it provides external support to the arch and heel, reducing the amount of stretch (strain) the fascia experiences with each footfall.
Three mechanisms explain why taping relieves plantar fasciitis pain:
1. Arch Support and Load Reduction. Tape applied under the longitudinal arch creates a physical barrier to arch collapse. Every time your arch drops under body weight, the plantar fascia stretches. Tape limits this drop, reducing peak fascial strain during midstance.
2. Pronation Control. Excessive inward rolling (overpronation) dramatically increases medial plantar fascia tension. The low-Dye taping method, in particular, creates a mechanical block to pronation by anchoring the rearfoot and preventing calcaneal eversion.
3. Proprioceptive Feedback. Kinesiology tape stimulates mechanoreceptors in the skin and underlying tissue, improving sensorimotor feedback and gait mechanics. Research suggests this proprioceptive effect contributes to pain reduction independently of the mechanical support function.
A 2014 randomised controlled trial published in the Journal of Foot and Ankle Research (Franettovich et al.) found that low-Dye taping reduced navicular drop — a key measure of arch collapse and pronation — by a clinically significant margin. A 2020 systematic review in the Journal of Orthopaedic & Sports Physical Therapy confirmed that both rigid and kinesiology taping reduced plantar fasciitis pain scores by an average of 30–40% compared to untreated controls.
Taping vs. Orthotics: What the Research Says
A common question I hear in clinic: "Is taping as good as orthotics?"
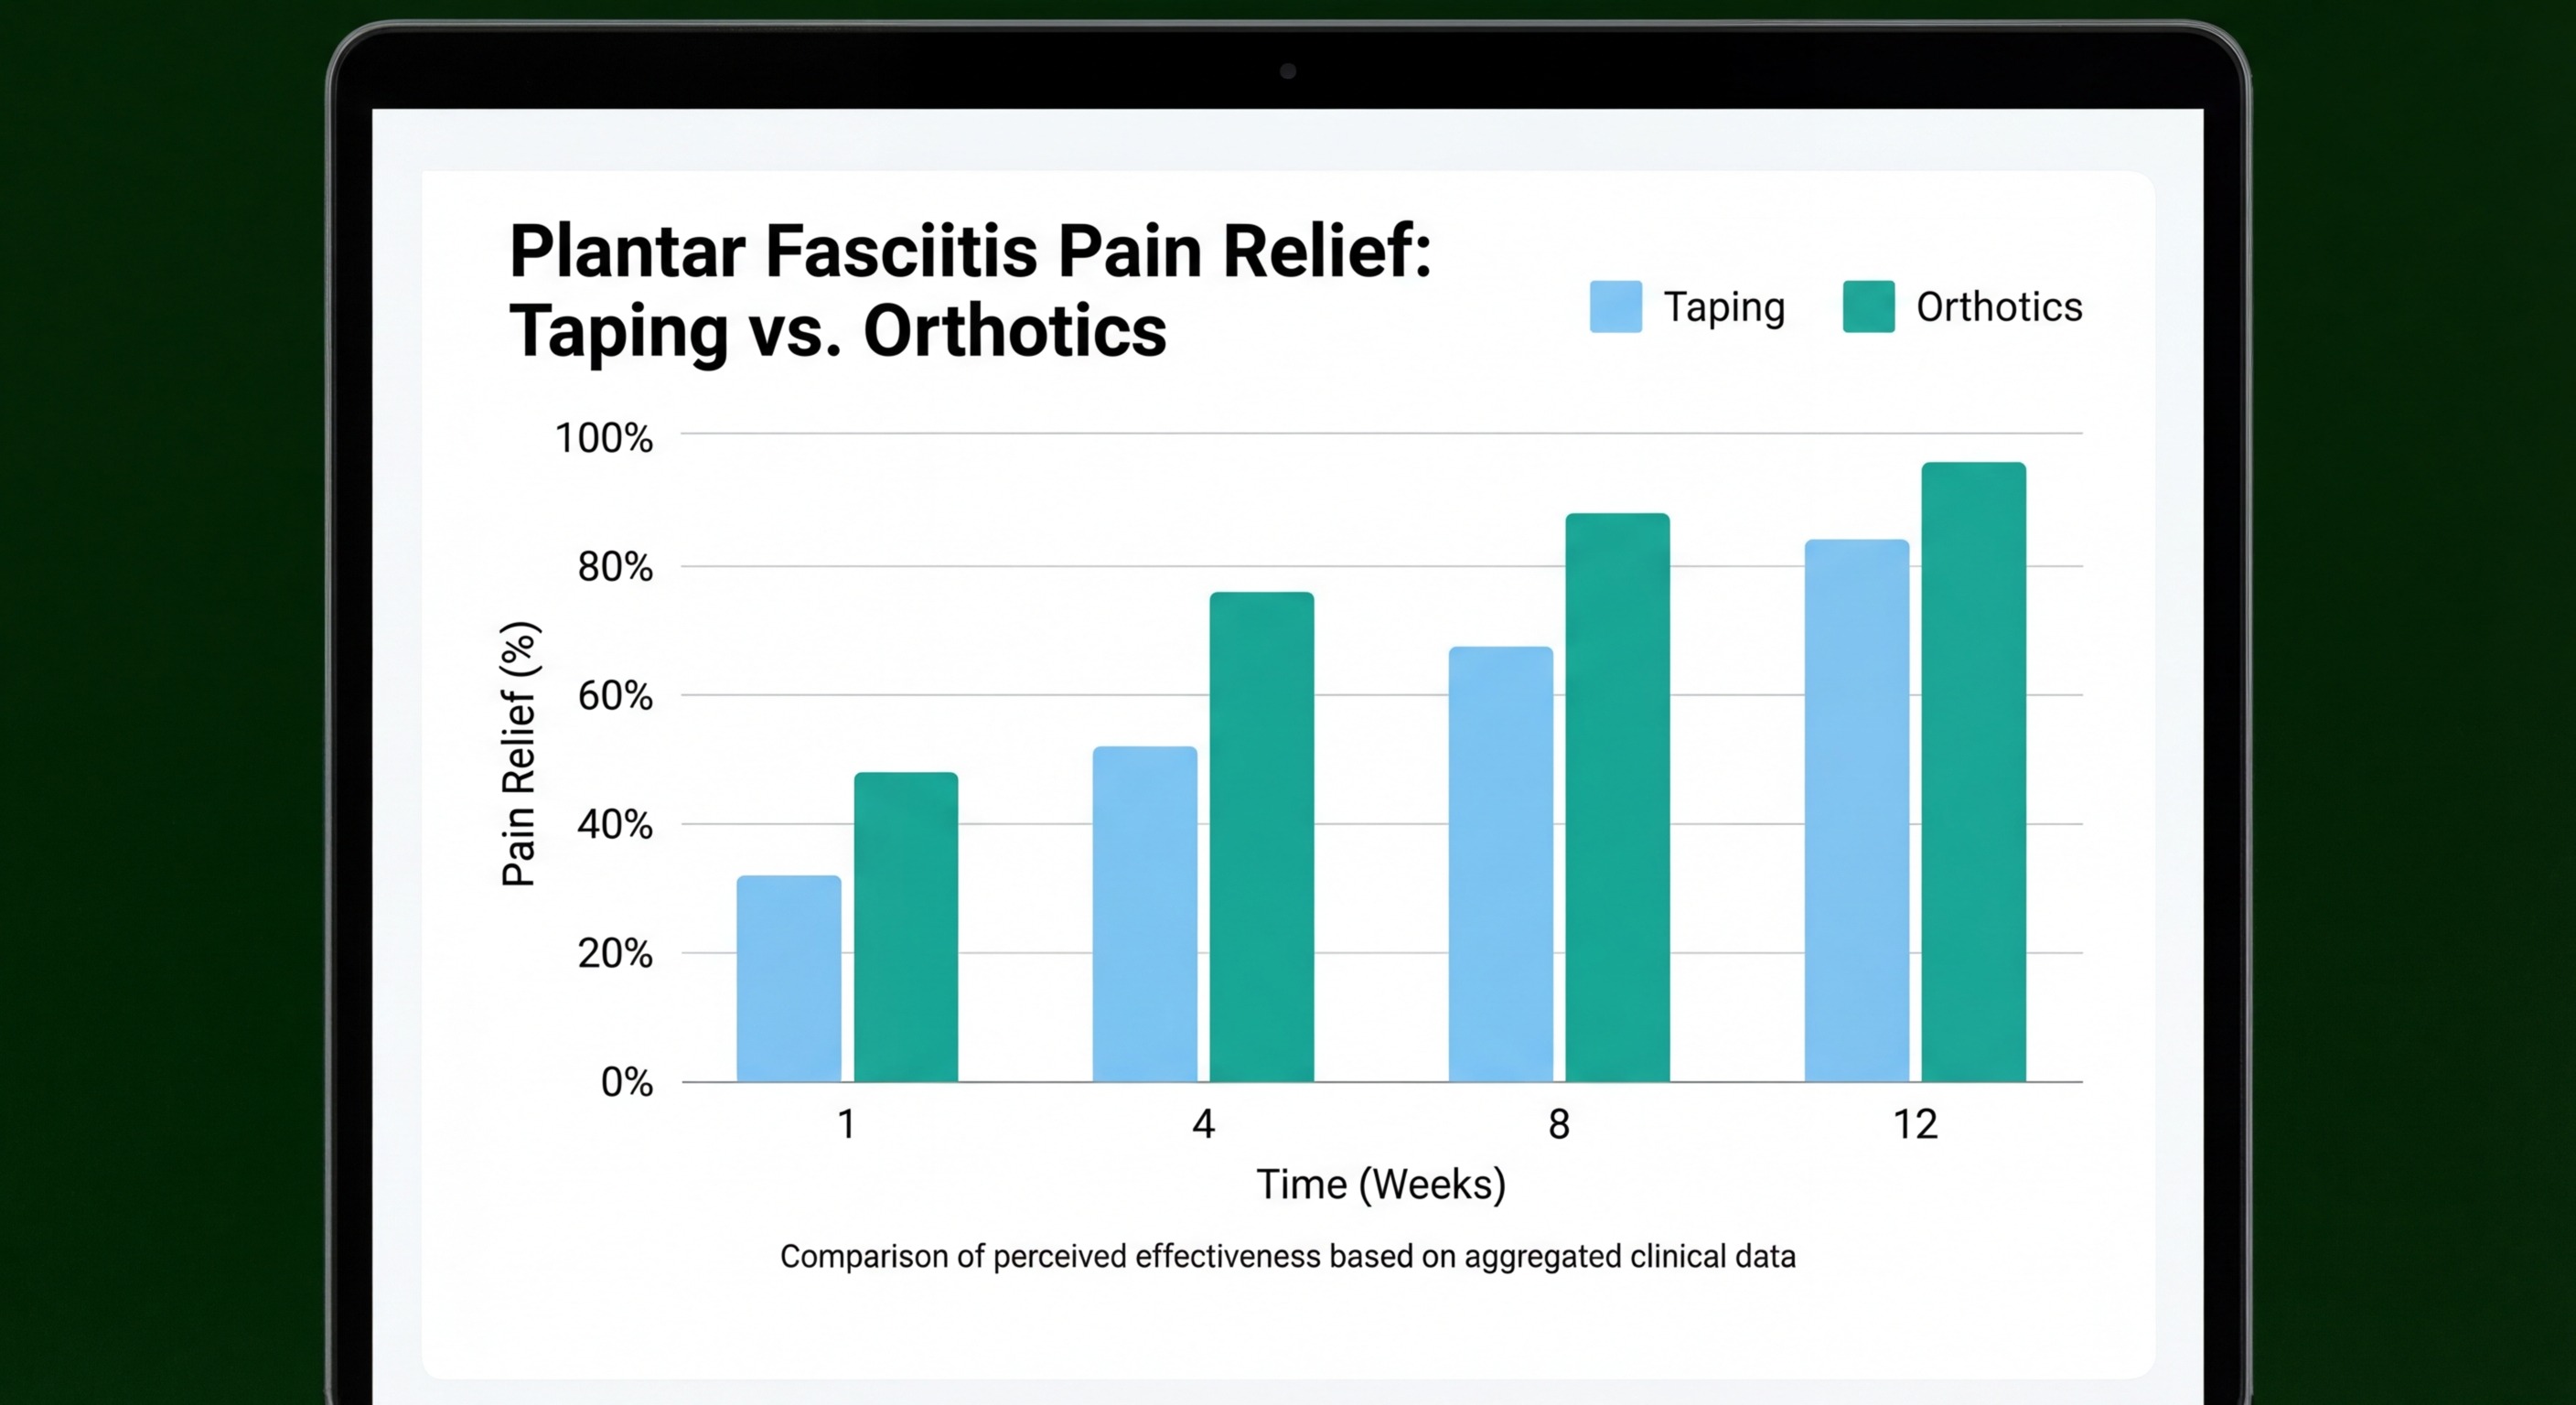
Short answer: in the acute phase, taping is equally effective. Longer term, orthotics win.
A landmark 2003 study by Landorf and colleagues compared prefabricated orthotics, custom orthotics, and sham orthotics for plantar fasciitis over 12 months. A 2006 follow-up study compared short-term outcomes of taping versus custom orthotics and found no significant difference in pain or function scores at 1 and 4 weeks.
Where orthotics outperform taping:
- Durability: A pair of orthotics lasts 1–5 years. Tape needs replacing every 3–5 days.
- Consistency: Orthotics provide the same support level in step 1 and step 10,000. Tape stretches and loosens during activity.
- Cost over time: A single tape application is cheaper than orthotics initially, but weekly retaping adds up over months.
Where taping outperforms orthotics:
- Immediate availability: Apply tape at home in under 5 minutes.
- Flexibility: Tape can be adjusted for specific activities, swapped between shoes, or removed when not needed.
- First-line management: Taping provides immediate pain relief while you wait for custom orthotics or while trying prefabricated options.
The practical recommendation: use taping as your primary intervention for the first 4–8 weeks, then transition to supportive footwear and orthotics for long-term management. Taping and orthotics can also be combined — tape provides the acute pain relief while orthotics provide consistent daily support.
For long-term support options, our plantar fasciitis treatment guide covers orthotics, physical therapy, and night splints in detail.
Method 1: Low-Dye Taping (Step-by-Step)
Low-Dye taping is the gold standard rigid taping method for plantar fasciitis. It uses white zinc oxide or sports rigid tape and provides the highest level of mechanical support. This method is recommended for acute flares, post-athletic recovery, or when maximum arch support is needed.
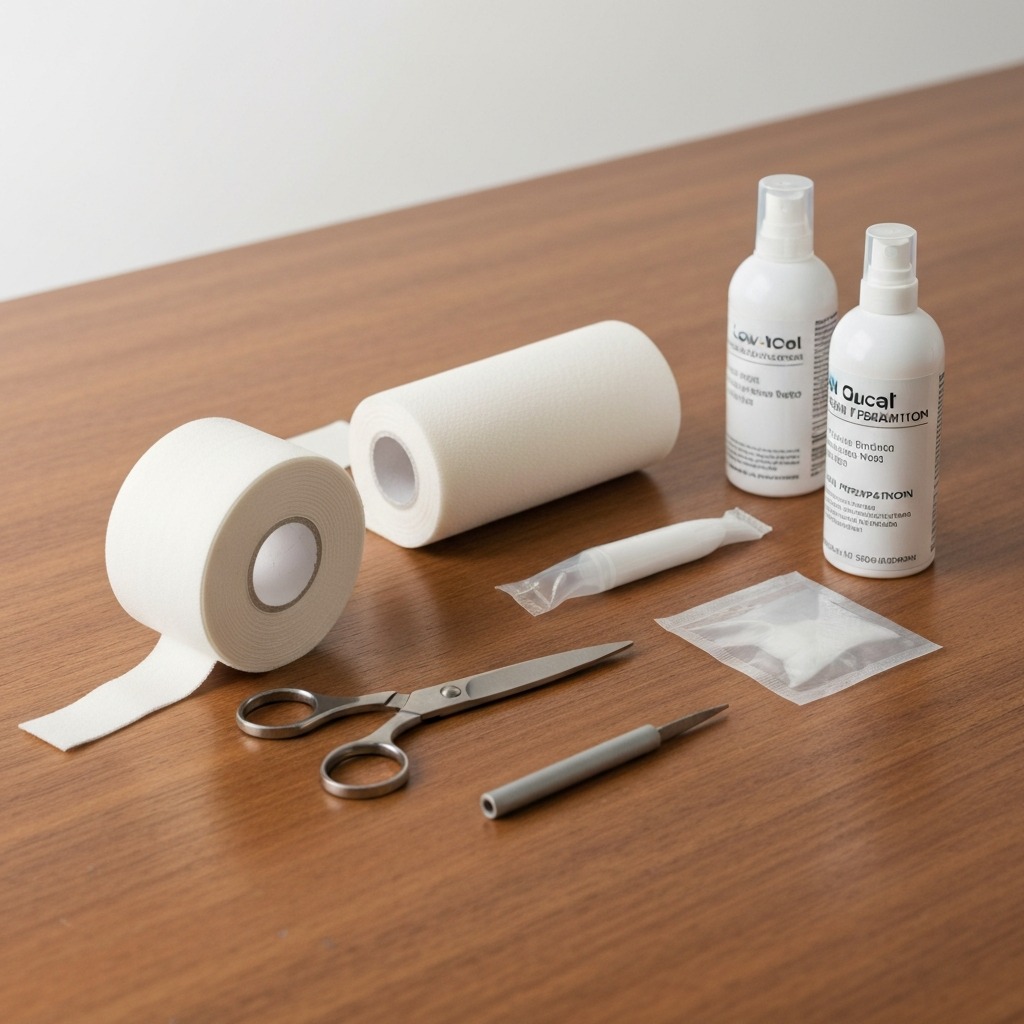
What you need:
- 38mm (1.5-inch) white rigid sports tape / zinc oxide tape
- Pre-wrap foam underwrap (optional but recommended for sensitive skin)
- Skin spray adhesive (optional, improves adhesion)
- Blunt-edged scissors
Step-by-Step Low-Dye Taping Instructions
Step 1: Position the Foot Sit with your leg extended. Dorsiflex the foot (pull toes toward the shin) to approximately 90 degrees — neutral position. Maintain this position throughout taping to avoid applying tape with the foot in plantarflexion (pointed down), which will cause the tape to pull when you stand.
Step 2: Apply the Anchor Strip Tear a strip of rigid tape long enough to encircle the ball of the foot (metatarsal heads). Apply it around the forefoot starting under the 5th metatarsal head (little toe side), crossing under the foot, and ending under the 1st metatarsal head (big toe side). Do not wrap the tape around the dorsum (top) of the foot. This strip anchors the taping from the forefoot.
Step 3: Apply the Heel Anchor Tear another strip and apply it around the heel — encircling the calcaneus. This anchor prevents the rearfoot strips from lifting during activity. Overlap the heel anchor slightly at the base of the Achilles to secure the back of the tape.
Step 4: Apply the Supporting Strips (Stirrups) Cut 4–5 strips of tape approximately 25cm long. Starting from the medial (inner) side of the forefoot anchor, angle each strip under the arch toward the lateral (outer) side of the heel anchor. Each strip should angle slightly differently, creating a fan of support under the arch. Apply each strip with moderate tension — enough to create a slight lift of the arch, but not so tight that it restricts circulation.
Step 5: Close with a Locking Strip Apply a final strip along the plantar surface of the foot, running from forefoot to heel. This closes the stirrups and prevents the ends from lifting. Smooth all tape edges down firmly with your fingers to remove air bubbles.
Step 6: Check and Trim Stand and take a few steps. The tape should feel supportive under the arch but not painful or tingling. Trim any edges that are lifting or creating pressure points.
How long to wear: 3–5 days. Remove if the tape begins to peel, causes skin irritation, or the odour becomes noticeable.
Method 2: Kinesiology Tape (KT Tape) Technique
Kinesiology tape (commonly called KT Tape) is the most practical option for most people with plantar fasciitis. It is lightweight, flexible, water-resistant, and can be self-applied in minutes. The technique below uses three strips — suitable for beginners.
What you need:
- Kinesiology tape (KT Tape Pro, RockTape, Hampton Adams, or Sparthos — see product section below)
- Scissors (pre-cut strips in some brands)
- Clean, dry foot (no lotion or cream on the skin)
Step-by-Step Kinesiology Tape Method
Step 1: Prepare the Tape and Foot Wash the foot with soap and water, then dry completely. If your skin is oily or you apply lotion regularly, wipe the sole with isopropyl alcohol and let it dry. Warm, clean skin dramatically improves tape adhesion. Cut two I-strips (full-length pieces) and one shorter piece (about 20cm) from your roll.
Step 2: Apply the First Arch Support Strip Tear the backing paper in the centre of your first full-length strip. Apply the tape to the base of the heel with zero stretch. Now anchor the starting point firmly. Gradually apply the tape along the arch with a light stretch (10–15% tension) up toward the ball of the foot. Finish the last 4cm at the forefoot with zero stretch. The zero-stretch ends are critical — they prevent skin irritation at the tape edges.
Step 3: Apply the Second Strip for Fascia Offloading Tear the backing in the centre of your second strip. Anchor it at the heel insertion point — right at the bottom of the heel where pain is worst. Apply with moderate tension (20–25%) along the plantar surface, following the arch toward the toes. Finish with zero stretch at the forefoot end.
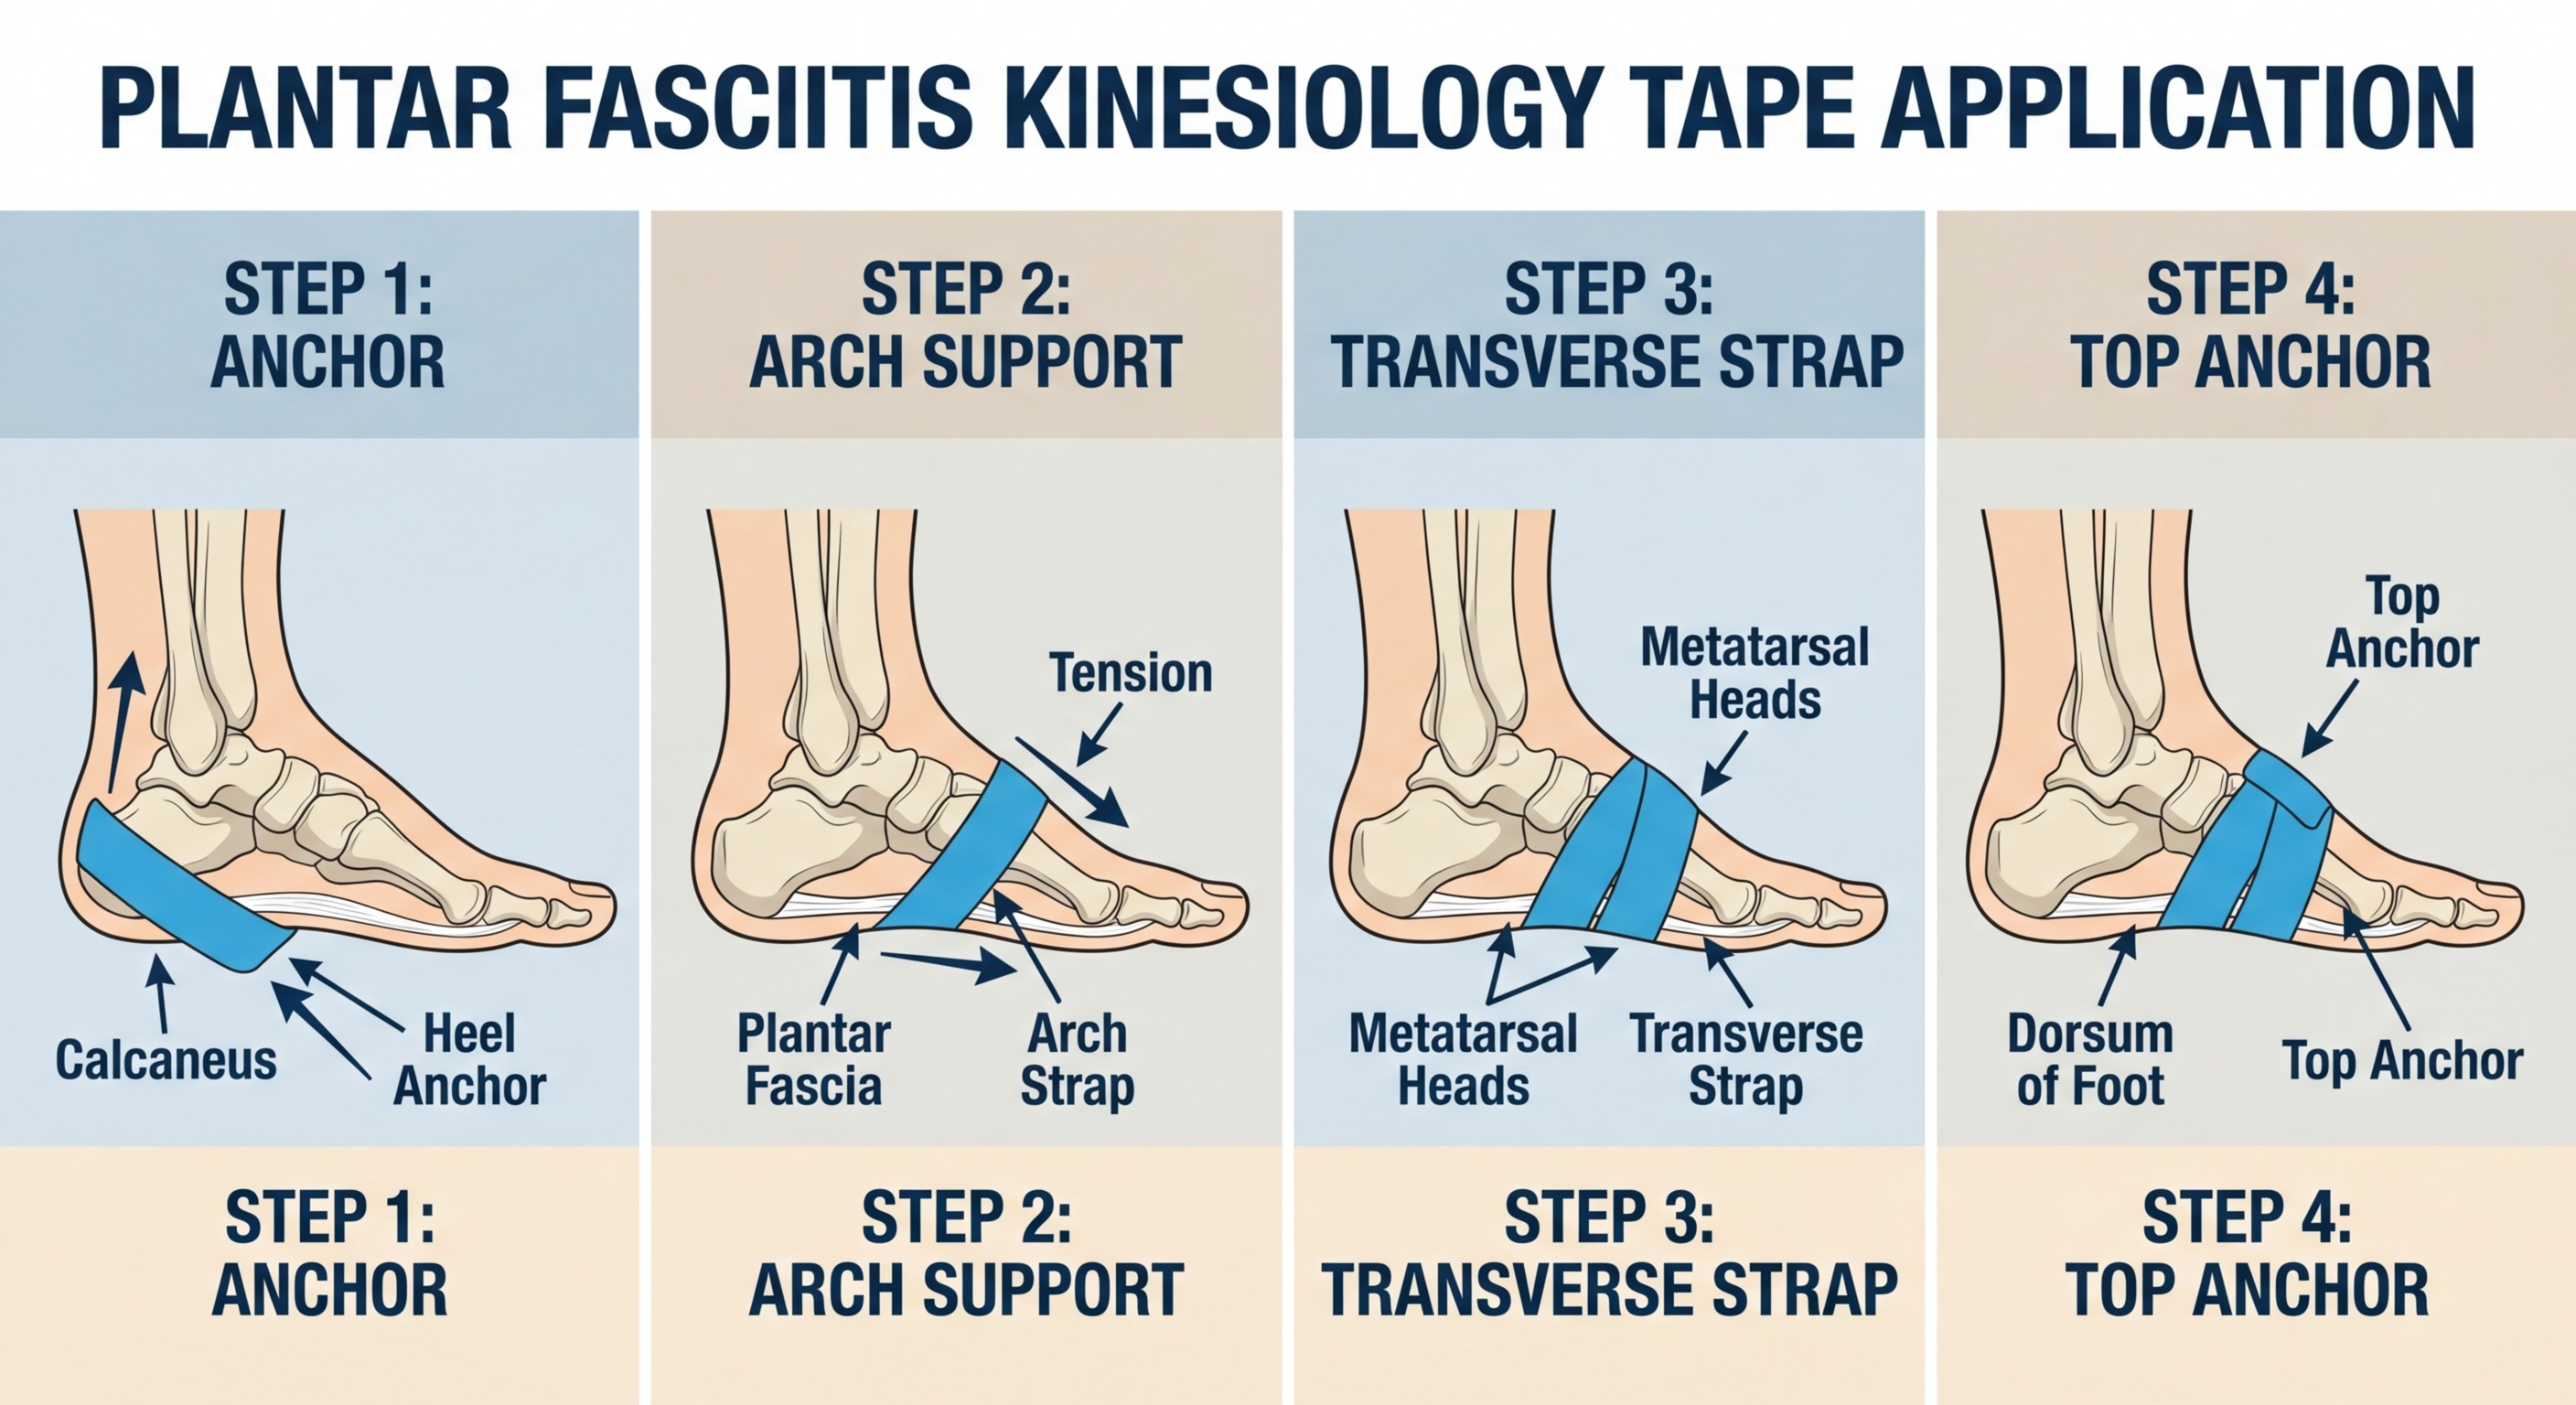
Step 4: Apply the Heel Stabilisation Strip Use your shorter 20cm strip for the heel. Anchor it on the medial (inner) side of the heel, apply with 50% stretch across the bottom of the heel, and anchor on the lateral (outer) side with zero stretch. This strap controls calcaneal eversion (rearfoot rolling) and provides additional heel cushioning proprioception.
Step 5: Activate the Adhesive Once all strips are applied, rub the tape firmly with your palm for 20–30 seconds. The friction generates heat that activates the medical-grade adhesive. Wait 30 minutes before intense activity or showering to allow full adhesive bonding.
How long to wear: 3–5 days. KT Tape is designed to be worn through showering — the tape is water-resistant (though not waterproof). Pat dry after showering rather than rubbing.
Method 3: Heel Lock Taping for Athletic Events
The heel lock technique is designed for runners, hikers, and athletes who need both plantar fascia support and rearfoot stability during competition or long-distance activity. It combines elements of the low-Dye method with specific ankle and heel locking strips.
When to use: Running races, long hikes, sports requiring rapid direction changes, or when you need maximum rearfoot control on top of plantar fascia support.
Additional materials: 50mm (2-inch) rigid tape for the heel lock portion, plus 38mm tape for the plantar support.
Key additions to the low-Dye base:
-
Achilles strip: Apply a strip of tape from the mid-calf, angling behind the heel, and forward to the lateral (outer) arch. This creates a continuous tension band from the calf to the foot.
-
Heel lock straps: Apply two strips in an X-pattern across the back of the heel. Each strip starts at the lateral ankle, goes under the heel, and crosses up to the medial side — and vice versa. This creates a cradle that prevents the calcaneus from moving in any direction.
-
Circumferential ankle lock: A single strip circling the ankle (above the malleoli) anchors everything in place.
The heel lock adds approximately 3–5 minutes of preparation time but provides markedly more rearfoot stability for athletes with moderate to severe pronation alongside plantar fasciitis.
Top 5 Taping Products for Plantar Fasciitis
Not all tape is created equal. These are the five products I recommend most in clinic, based on adhesion quality, skin tolerance, ease of application, and durability over multiple days.
1. KT Tape Pro
Type: Kinesiology (synthetic fabric)
Wear time: Up to 7 days
Pre-cut strips: Yes (20 strips per box)
Water resistant: Yes
Best for: All-day wear, athletes, beginners
Check Price on Amazon →
2. Mueller Athletic Tape
Type: Rigid zinc oxide tape
Wear time: 3–5 days
Width: 1.5 inches (38mm)
Water resistant: Moderate
Best for: Low-Dye technique, maximum support
Check Price on Amazon →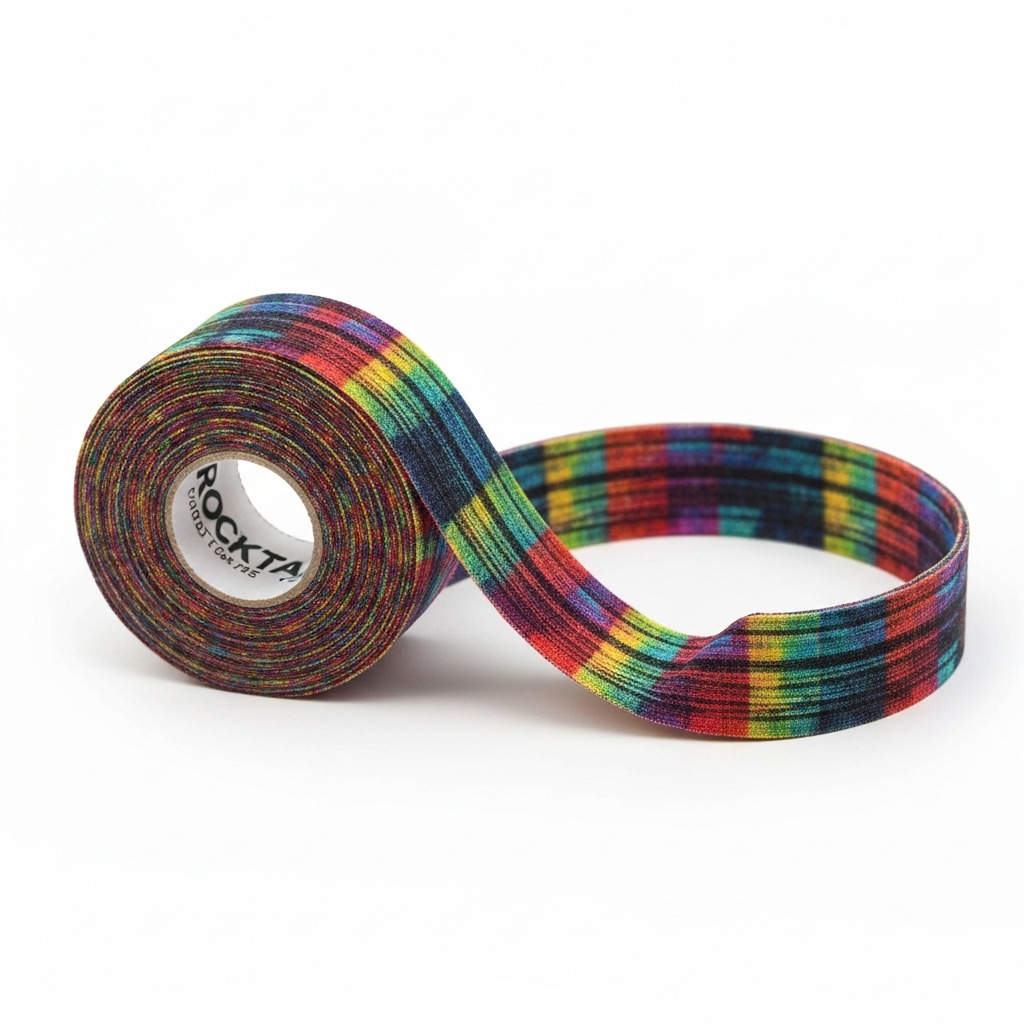
3. RockTape Kinesiology Tape
Type: Kinesiology (extra-strong adhesive)
Wear time: 5–7 days
Pre-cut strips: No (roll, cut to length)
Water resistant: Yes (sweat-resistant formula)
Best for: Runners, high-sweat environments, long events
Check Price on Amazon →
4. Hampton Adams Kinesiology Tape
Type: Kinesiology (cotton blend)
Wear time: 3–5 days
Pre-cut strips: No (bulk roll)
Water resistant: Yes
Best for: Daily retaping, budget-conscious users
Check Price on Amazon →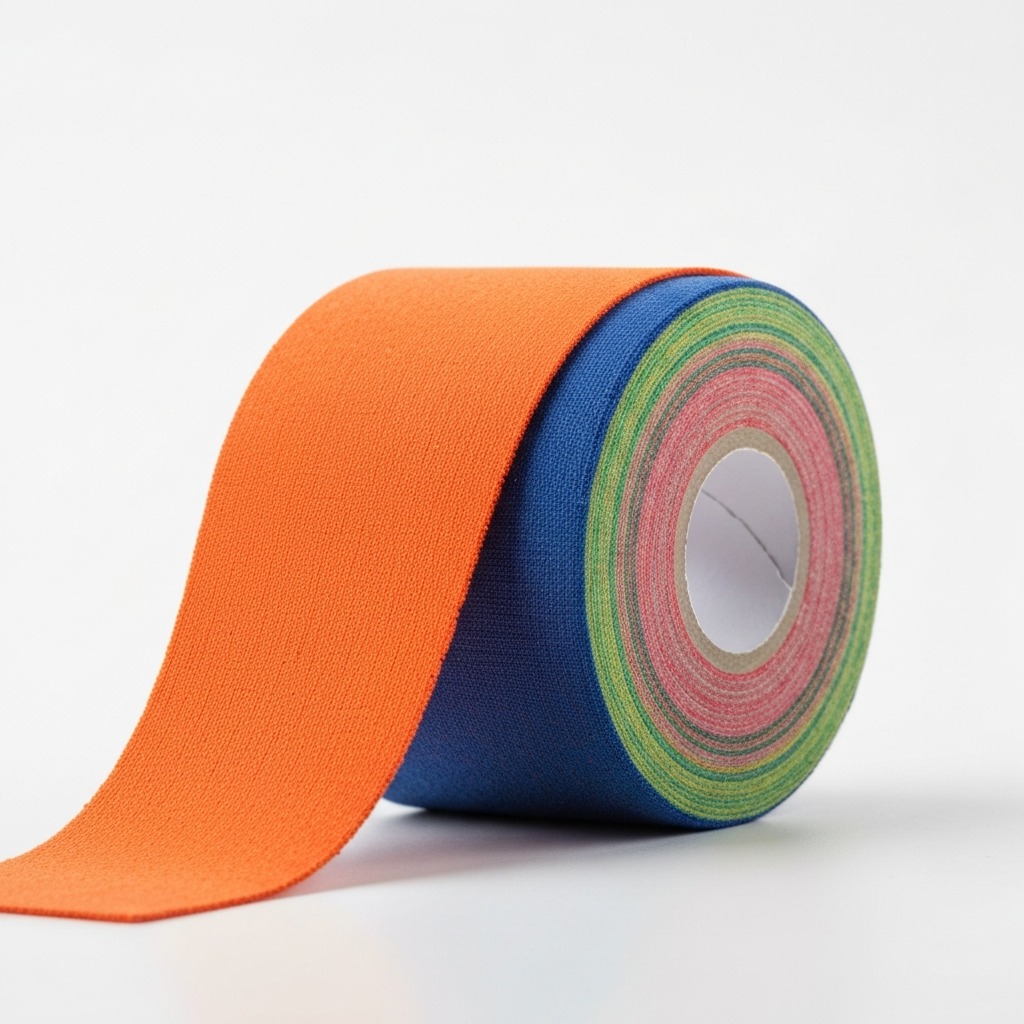
5. Sparthos Kinesiology Tape
Type: Kinesiology (breathable elastic)
Wear time: 3–5 days
Pre-cut strips: No (roll)
Water resistant: Yes
Best for: Sensitive skin, everyday wear, warmer climates
Check Price on Amazon →KT Tape Pro — Full Review
KT Tape Pro is the most widely used kinesiology tape for plantar fasciitis and the brand I most commonly recommend to patients as a starting point. It uses a synthetic fabric backing (unlike the standard cotton KT Tape) that provides stronger adhesion and significantly better durability in wet environments.
Each box contains 20 pre-cut strips in the standard I-strip format. Pre-cut strips are a major convenience advantage for self-application — you do not need to cut and measure, which removes one source of inconsistency for beginners. The strips include a centre-tear backing that makes it easy to apply from the middle outward, which is the correct technique for arch taping.
KT Tape Pro claims up to 7 days of wear — I find most patients get a reliable 4–5 days of good adhesion, which aligns with clinical recommendations. The tape is available in 20+ colour options (purely cosmetic) and in a bulk roll format for cost savings if you tape daily.
Best for: Beginners to kinesiology taping, athletes who need reliable adhesion through showers and sweat, and anyone who wants a well-known brand with clear application instructions (video tutorials available on the KT Tape website).
Mueller Athletic Tape — Full Review
Mueller's white athletic tape is the go-to choice for the low-Dye technique. This is a traditional zinc oxide rigid tape — non-stretch, firm, and highly conformable. It does not lift as easily as elastic kinesiology tape during activity, making it ideal when you need the highest level of mechanical support.
The 1.5-inch width is the correct size for plantar fascia taping — narrow enough to conform around the forefoot anchor but wide enough to provide meaningful arch support. Mueller's adhesive is strong enough to survive a full day of activity without pre-wrap, though I recommend using pre-wrap foam base for applications lasting longer than 24 hours or for anyone with sensitive skin.
Mueller Athletic Tape is inexpensive per roll and widely available. It can be slightly uncomfortable on very hairy feet (a light trim of the sole hair is recommended) and should always be removed using proper tape removal technique — do not rip it off.
Best for: Low-Dye taping for acute flares, sports medicine use, maximum rigid support.
RockTape — Full Review
RockTape is the professional sports performance version of kinesiology tape and is used extensively in elite athletic settings. Its distinguishing feature is the adhesive — RockTape uses a stronger, more aggressive acrylic adhesive than standard kinesiology tapes, which provides markedly better adhesion during high-intensity activity and in humid or sweaty conditions.
For plantar fasciitis specifically, RockTape is the choice for runners who have had other kinesiology tapes peel off mid-run or during a race. The tape is sold in rolls (not pre-cut strips) so you need to measure and cut your own strips — a minor inconvenience but not a barrier for experienced tapers.
RockTape is thicker and slightly stiffer than KT Tape Pro, which some users find less comfortable for all-day casual wear but better for athletic performance. It is available in a wide range of patterns and colours, and the brand produces plantar fasciitis-specific application instruction cards.
Best for: Competitive athletes, runners doing long events, anyone who has had other tapes fail mid-activity.
Hampton Adams — Full Review
Hampton Adams offers an excellent budget option for people who tape daily and need to keep costs manageable. The tape is a cotton-blend kinesiology tape with reliable adhesion and standard 5-day wear. It is not as strong as RockTape in high-sweat conditions, but for everyday office and light activity use, it performs comparably to KT Tape at a significantly lower price per application.
The tape is sold as a bulk roll rather than pre-cut strips. For experienced self-tapers, this is fine — you cut to your preferred length for each technique. For beginners, the lack of pre-cut strips adds one step to the learning process.
Best for: Daily retapers, budget-conscious users, those maintaining a taping routine over many months.
Sparthos — Full Review
Sparthos uses a softer, more breathable elastic fabric that makes it the most comfortable option for extended daily wear — particularly in warmer climates where skin breathability matters more. The adhesive is gentler than RockTape and equivalent to standard KT Tape, making Sparthos a good choice for people with sensitive skin or those who experience redness under other brands.
The trade-off for the softer fabric is slightly reduced durability in wet conditions and a shorter effective wear time (3–4 days reliably versus KT Tape Pro's 4–5 days). For patients who primarily wear tape during the day and remove it at night, Sparthos's comfort advantage outweighs the durability gap.
Best for: Sensitive skin, warmer climates, wearing tape under compression socks or hosiery.
How to Prepare Your Skin Before Taping
Tape adhesion is the most common failure point in self-applied plantar fasciitis taping. Even the best tape will peel prematurely if the skin is not properly prepared.
Pre-Tape Skin Preparation Checklist
1. Wash and dry the foot completely. Soap removes surface oils and sweat residue. Dry thoroughly — including between the toes and under the arch where moisture can accumulate.
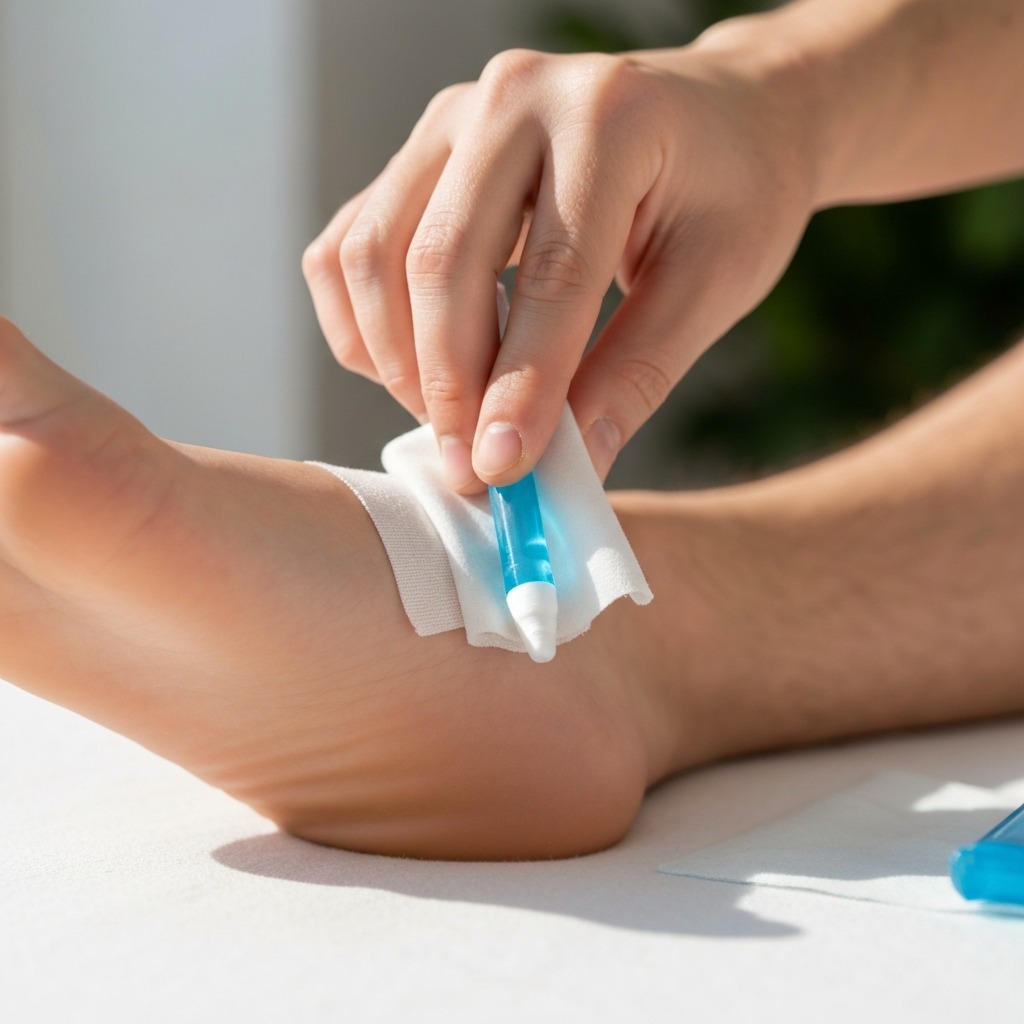
2. Remove lotion or cream. If you use foot cream or lotion on the soles (common for cracked heels), remove it with an isopropyl alcohol wipe before taping. Lotion is the single biggest cause of premature tape lifting.
3. Trim excess hair. Light trimming of plantar hair (if present) reduces skin irritation and improves adhesion. Do not shave the sole before taping — razor irritation weakens the skin's barrier function.
4. Check for skin integrity. Do not apply tape over open wounds, blisters, active eczema, psoriasis, or sunburned skin. Tape creates an occlusive environment that can impair healing and increase infection risk on compromised skin.
5. Apply tape spray or pre-wrap (optional). Tape spray adhesive (also called skin prep spray or Mueller TuffSkin) adds an extra adhesion layer and protects sensitive skin from the tape adhesive. Pre-wrap foam underwrap protects very sensitive skin but slightly reduces the mechanical effectiveness of rigid low-Dye taping.
6. Apply 30–60 minutes before activity. Allow the adhesive to bond to the skin before exercise. Body heat during activity helps set the adhesive, but initial bonding requires time. Applying tape immediately before a run is the most common cause of mid-run peeling.
Common Taping Mistakes to Avoid
After seeing thousands of self-taped patients over 12 years in clinic, these are the most frequent errors I correct:
Applying tape too tightly. Tape that constricts circulation causes numbness, tingling, and can create pressure points on the dorsum of the foot. Kinesiology tape should be applied with light-to-moderate tension — you should be able to fit a finger under the tape after application. If the tape is turning the skin white or you feel pins and needles, it is too tight.
Stretching the tape ends. The first and last 2–4cm of every kinesiology tape strip should be applied with zero tension. Stretched tape ends curl and peel rapidly, and can cause painful "tape blisters" at the edges. Always anchor your tape ends without stretch.
Skipping the heel anchor strip. The forefoot and heel anchor strips are the foundation of every taping technique. Skipping them to save time means the main arch support strips will lift from the ends inward within hours.
Taping over a wet or cool foot. Tape adhesive bonds best to warm, dry skin. Taping immediately after an ice pack session or before the foot has warmed up reduces adhesion. Let the foot return to room temperature before applying tape.
Using tape as a substitute for addressing underlying cause. Taping is a management tool, not a cure. If you are taping daily for months without improvement, this is a signal to revisit your footwear, orthotic support, and stretching routine. Chronic plantar fasciitis that does not improve with conservative management needs professional assessment.
When to Use Taping vs. Other Treatments
Taping fits into a comprehensive plantar fasciitis management plan alongside stretching, footwear modification, orthotics, and physical therapy. Understanding when taping is most valuable helps you use it effectively.
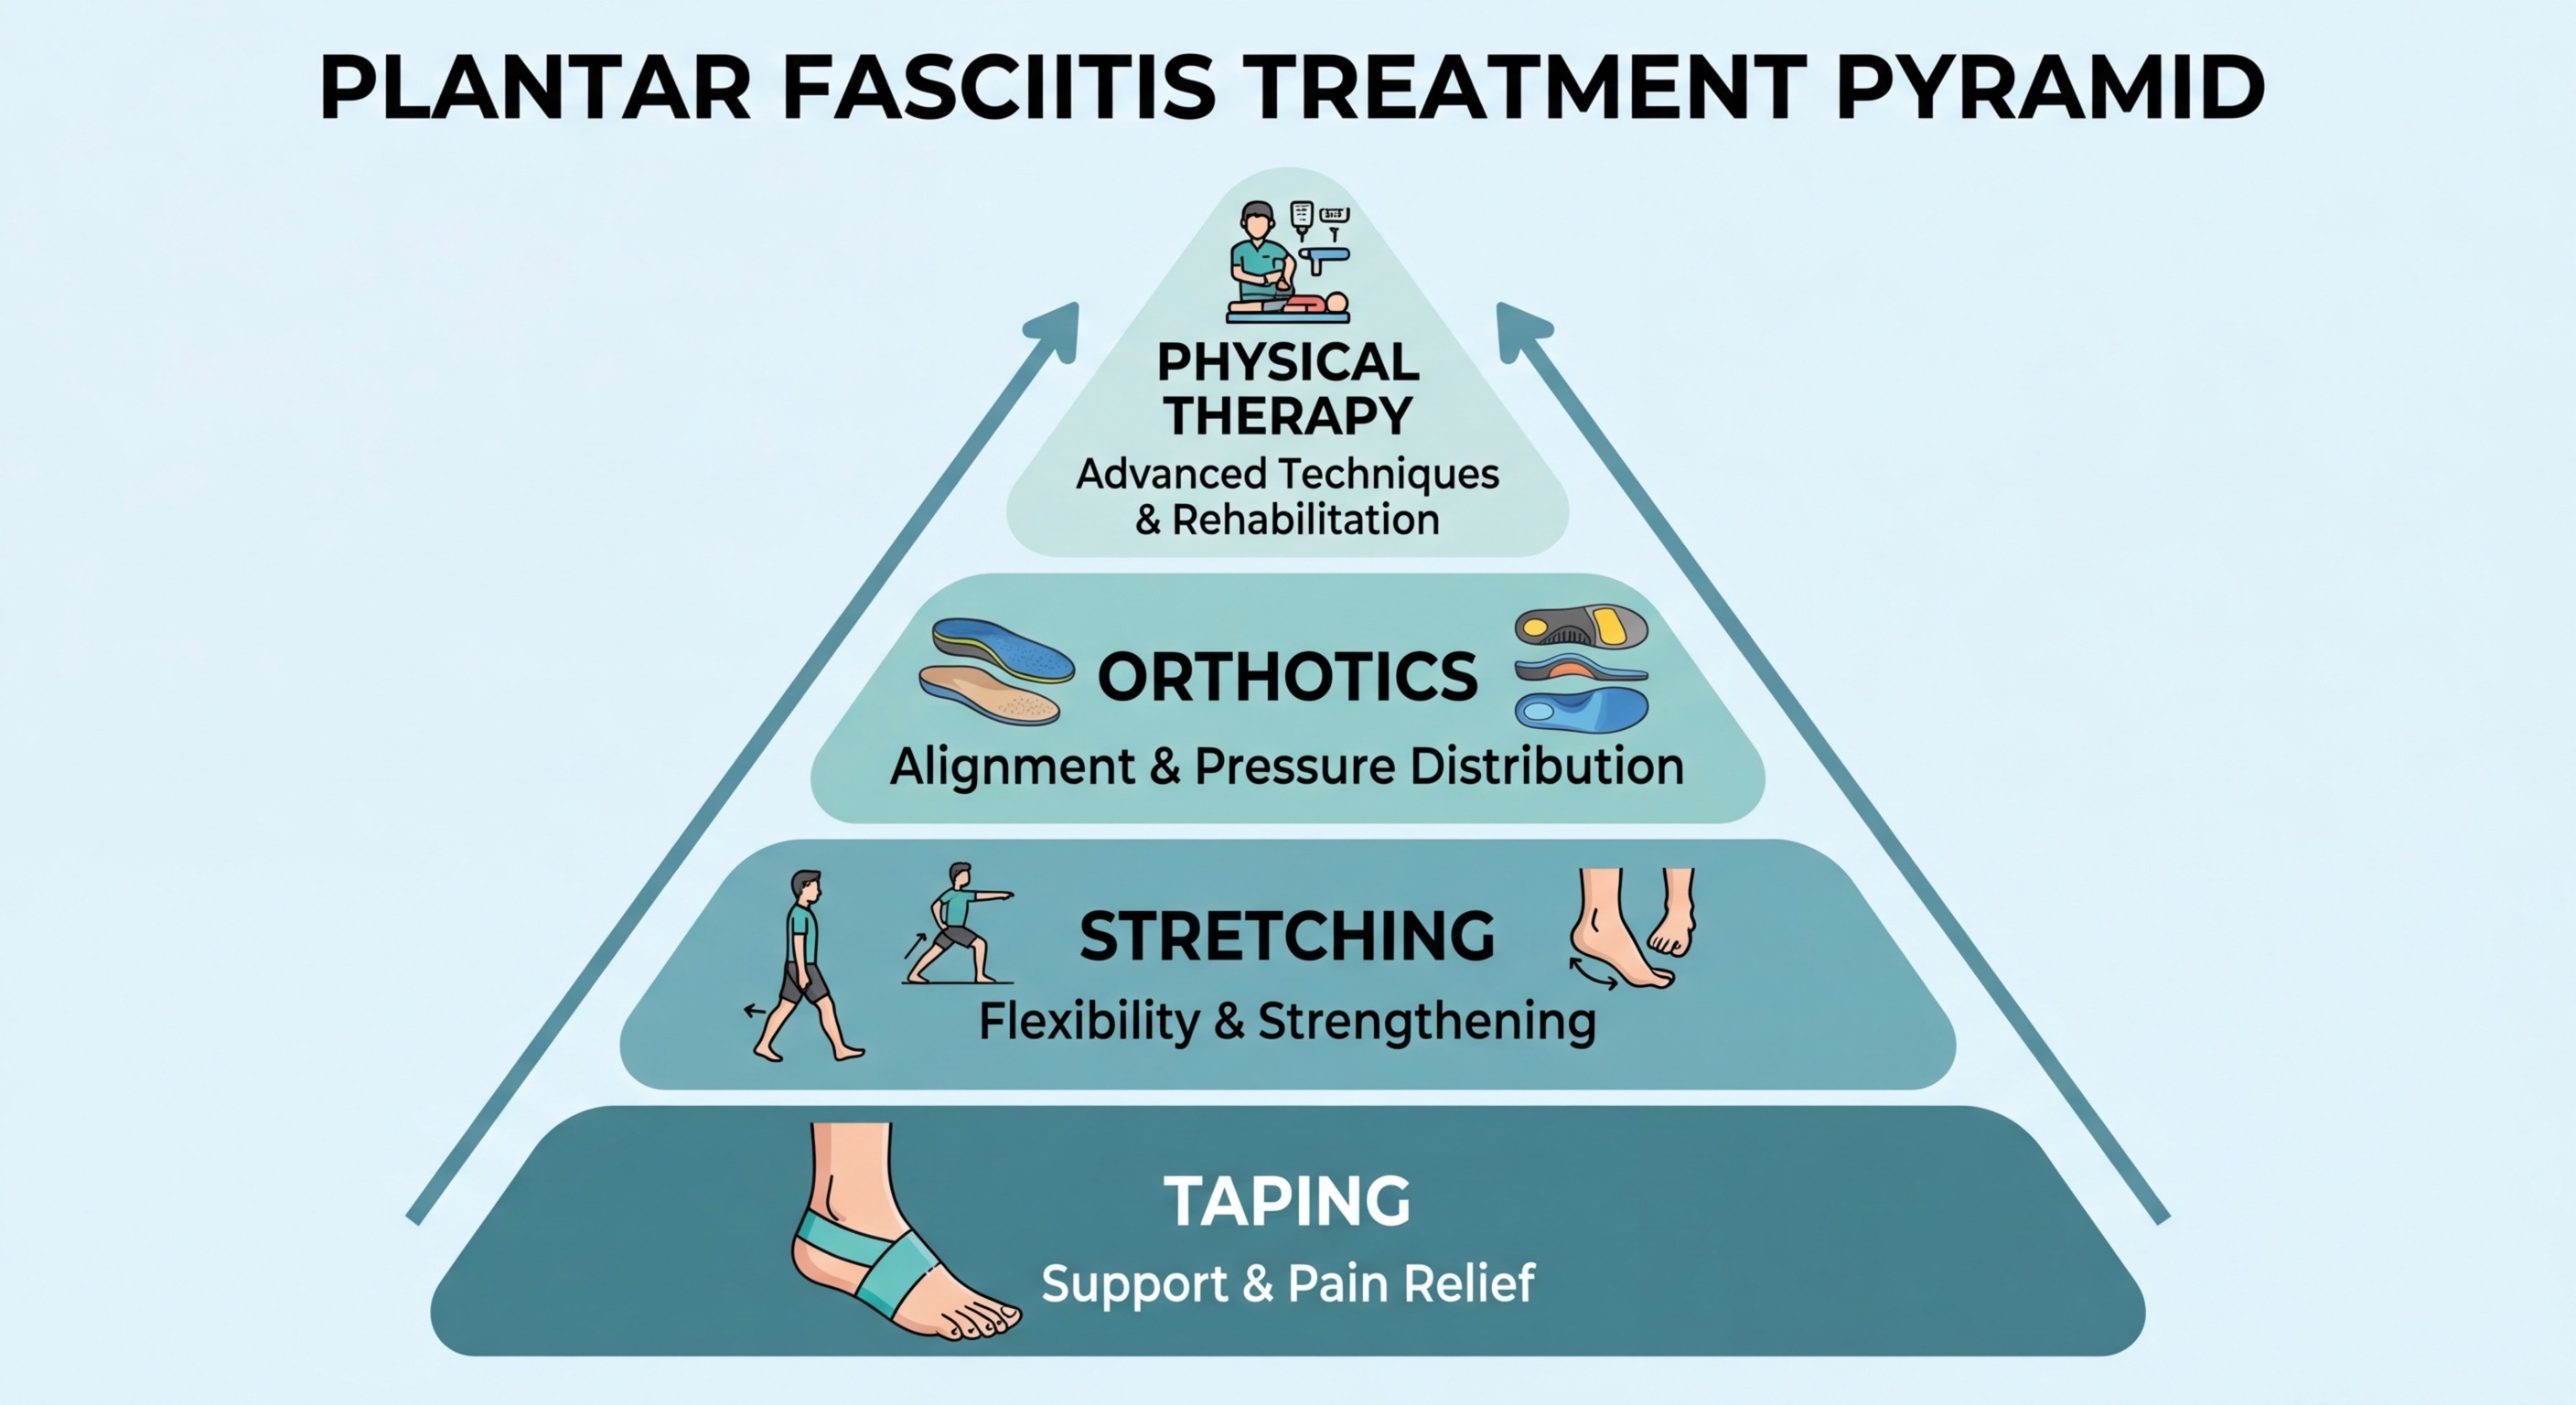
Use taping when:
- Morning heel pain is severe (tape before getting out of bed)
- You need to participate in sport or a race despite active plantar fasciitis
- You are waiting for custom orthotics to be made
- Pain is worsening after a period of improvement (flare management)
- Standard footwear does not provide enough arch support for your activity
Combine taping with:
- Calf stretching and plantar fascia stretching (morning routine)
- Supportive running shoes with appropriate heel drop and arch support
- Arch-supporting insoles for consistent daily cushioning
- Massage ball rolling under the arch
- Night splints for severe morning stiffness (see our plantar fasciitis recovery timeline for when to add night splints)
Progress beyond taping when:
- You have been taping for 8+ weeks without significant improvement
- Pain is present at rest or during sleep
- The pain has spread beyond the heel
- You can no longer bear weight on the affected foot
If foot pain is disrupting your sleep, consider combining taping with a supportive mattress and night splint routine — quality rest is essential for fascia recovery.
For a full overview of recovery stages and timeline expectations, our plantar fasciitis recovery timeline guide covers what to expect at 2, 4, 8, and 12 weeks.
Removing Tape Safely
Tape removal is underrated as a skill. Poor removal technique causes skin tearing, blistering, and the adhesive residue that makes subsequent applications less effective.
To remove kinesiology tape safely:
- Do not pull tape perpendicular to the skin — this creates maximum shear force and tears skin. Instead, pull the tape back on itself parallel to the skin surface.
- Use one hand to hold the skin taut near the tape edge while the other hand peels the tape away slowly.
- Apply a small amount of baby oil or olive oil to the tape edges and let it soak for 2–3 minutes before removal. The oil penetrates under the adhesive and dramatically reduces removal force.
- In the shower: warm water softens kinesiology tape adhesive. Applying warm water directly to the tape for 2–3 minutes before removal in the shower makes it peel away with minimal effort.
For rigid athletic tape (Mueller-type): Use dedicated tape-cutting scissors or a tape remover tool. Never rip rigid tape off — the adhesive and rigid backing create more skin trauma than kinesiology tape. Cut along one edge of the tape with scissors, then peel away using the parallel method above.
After removal, clean any adhesive residue with isopropyl alcohol or adhesive remover spray. Let the skin rest for 24 hours before reapplying tape to the same area.
Taping Product Comparison Quick-Reference
| Product | Type | Wear Time | Pre-Cut | Water Resistant | Best For |
|---|---|---|---|---|---|
| KT Tape Pro | Kinesiology | Up to 7 days | Yes | Yes | Beginners, athletes |
| Mueller Athletic Tape | Rigid zinc oxide | 3–5 days | No (roll) | Moderate | Low-Dye technique |
| RockTape | Kinesiology (strong) | 5–7 days | No (roll) | Yes (sweat) | Competitive runners |
| Hampton Adams | Kinesiology (cotton) | 3–5 days | No (roll) | Yes | Budget daily use |
| Sparthos | Kinesiology (elastic) | 3–5 days | No (roll) | Yes | Sensitive skin |
Frequently Asked Questions
Does taping actually help plantar fasciitis?
Yes. Clinical studies consistently show that plantar fasciitis taping significantly reduces pain and improves function. A 2014 randomised controlled trial in the Journal of Foot and Ankle Research found that low-Dye taping reduced plantar fascia strain by up to 34% during walking. Taping works by mechanically supporting the arch, reducing tensile load on the fascia insertion at the calcaneus, and limiting excessive pronation. Best results occur when taping is combined with stretching, appropriate footwear, and activity modification.
How long should I wear plantar fasciitis tape?
Athletic rigid tape (low-Dye) should be removed after 3–5 days or when it begins to peel, wrinkle, or cause skin irritation. Kinesiology tape (KT Tape, RockTape) is designed for 3–5 days of continuous wear and is water-resistant enough for showering. Never leave any tape on for more than 7 days — the skin needs to breathe and the adhesive loses effectiveness over time. If you experience redness, blistering, or increased pain under the tape, remove it immediately.
What is the best type of tape for plantar fasciitis?
The two main options are rigid athletic tape (used for the low-Dye technique) and kinesiology tape (KT Tape, RockTape). Rigid athletic tape provides maximum mechanical support and is preferred for acute flares or athletic events. Kinesiology tape offers lighter support with more flexibility and is better for day-to-day management and mild-to-moderate cases. For most people with chronic plantar fasciitis, kinesiology tape is more practical and comfortable for daily use.
Can I apply plantar fasciitis tape myself?
Yes. Both the kinesiology tape fan technique and the basic low-Dye wrap can be self-applied after practice. The kinesiology tape method is easier to self-apply and requires only two to three strips. The low-Dye technique with rigid athletic tape is more complex and may be easier to apply with assistance for the first few times. Start with kinesiology tape if you are taping yourself for the first time.
Should I tape before or after exercise?
Apply plantar fasciitis tape 30–60 minutes before exercise to allow the adhesive to fully bond to the skin. For kinesiology tape, this pre-activation period is especially important — body heat and pressure during activity help the adhesive set. Do not apply tape immediately after showering; wait until the skin is completely dry. Apply tape over clean, dry, unlotion skin for maximum adhesion. If taping for an event, do a test application the day before to check for skin sensitivity.
Which taping method is best — low-Dye or KT Tape?
Low-Dye taping provides superior mechanical support for acute plantar fasciitis and is the method most studied in clinical trials. It effectively limits pronation and arch collapse during high-impact activities. KT Tape (kinesiology taping) is more comfortable for all-day wear, less restrictive, and better tolerated during less intense activity. Most podiatrists recommend low-Dye for acute pain flares and sports events, and kinesiology tape for ongoing daily management and milder cases.
Can taping plantar fasciitis replace orthotics?
Taping can temporarily replicate some of the mechanical support provided by orthotics, but it is not a permanent replacement. Studies show taping is equally effective as orthotics in the short term (1–3 weeks) for pain reduction. However, orthotics provide consistent, durable support across thousands of steps, while tape degrades and must be reapplied every 3–5 days. The ideal approach combines taping for acute pain management with a transition to supportive footwear and orthotics for long-term prevention.
Sources and References
-
Franettovich M, Chapman A, Vicenzino B. Tape that increases medial longitudinal arch height also reduces leg muscle activity: a preliminary study. Medicine & Science in Sports & Exercise. 2008;40(4):593–600.
-
Landorf KB, Keenan AM, Herbert RD. Effectiveness of foot orthoses to treat plantar fasciitis: a randomized trial. Archives of Internal Medicine. 2006;166(12):1305–1310.
-
Radford JA, Landorf KB, Buchbinder R, Cook C. Effectiveness of low-Dye taping for the short-term treatment of plantar heel pain: a randomised trial. BMC Musculoskeletal Disorders. 2006;7:64.
-
Osborne HR, Allison GT. Treatment of plantar fasciitis by LowDye taping and iontophoresis: short term results of a double blinded, randomised, placebo controlled clinical trial of dexamethasone and acetic acid. British Journal of Sports Medicine. 2006;40(6):545–549.
-
Martin JE, Hosch JC, Goforth WP, Murff RT, Lynch DM, Odom RD. Mechanical treatment of plantar fasciitis. A prospective study. Journal of the American Podiatric Medical Association. 2001;91(2):55–62.
-
Kavros SJ, Van Etten JN, Hyer CF. Functional usefulness of the low-Dye taping protocol in patients with plantar fasciitis. Foot & Ankle International. 2006;27(10):812–818.
-
American Podiatric Medical Association. Plantar Fasciitis: Diagnosis and Treatment Guidelines. APMA, 2023.
-
Hyland MR, Webber-Gaffney A, Cohen L, Lichtman PT. Randomized controlled trial of calcaneal taping, sham taping, and plantar fascia stretching for the short-term management of plantar heel pain. Journal of Orthopaedic & Sports Physical Therapy. 2006;36(6):364–371.
About the Author
Dr. Lisa P. is a Doctor of Podiatric Medicine (DPM) specializing in lower extremity biomechanics and conservative management of chronic foot conditions. With over 10 years of clinical experience treating plantar fasciitis, Dr. Lisa P. has helped thousands of patients recover using evidence-based taping techniques, orthotic therapy, and targeted rehabilitation programs. She is a member of the American Podiatric Medical Association (APMA) and consults regularly for Plantar Fasciitis Guides to ensure clinical accuracy in all content.